How to Wire a VFD with a Self-Lock Push Button?
Variable Frequency Drives (VFDs) are essential for adjusting motor speed and ensuring efficient operation. In this post, ATO will guide you through the process of VFD control wiring using a self-lock push button switch to run a motor in the forward direction. Additionally, we'll cover the basics of variable frequency drives (VFDs) programming to ensure seamless integration and operation.
Equipment Required
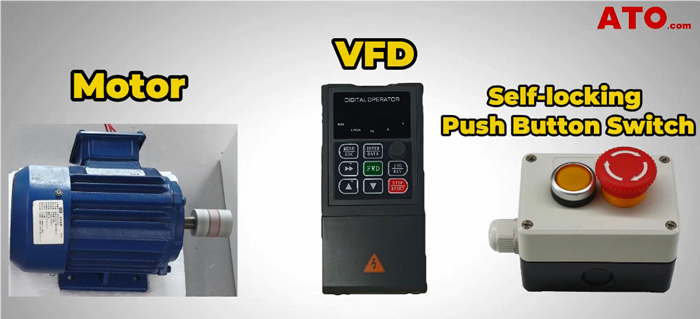
Before we begin, let's take a quick look at the equipment we'll be using:
- A motor
- Variable Frequency Drive (VFD) Model GK3000 (upgraded)
- Self-locking push button in a switch control box
- Necessary wiring
Make sure you have these components ready before proceeding. All these components are available at ATO.com.
Procedure for Connecting a VFD with a Lock Switch
Step 1: Connect the Power Source to the VFD
- Locate the terminals labeled L and N on the VFD.
- Connect these terminals to your power supply as shown in the circuit diagram.
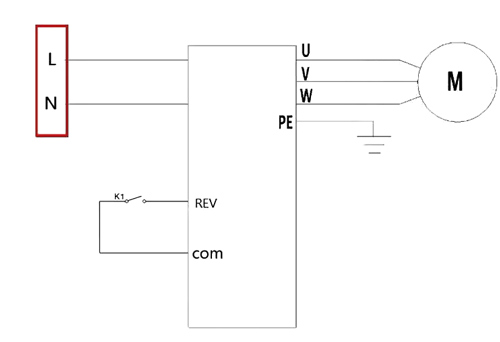
Step 2: Connect the Motor to the VFD
- Locate the three output terminals labeled U, V, and W on the VFD.
- Connect the power cable of the motor to these terminals.
- Double-check the connections to ensure they are secure and follow the above wiring diagram.
Step 3: Wiring the Self-Lock Switch
- Open the switch control box by undoing the screws and taking out the switch.
- Connect a yellow and a white wire to the NO (Normally Open) contacts of the push button switch.
- Insert the wires into the terminals and secure them in place.
- Ensure the connections are tight and secure.
- Close the switch box and route the wires through the knock-outs for easy wiring access.
Step 4: Connect the Switch to the VFD
As the given picture shows, when we select 1 in P3.14, the motor will start running forward only when K1 is closed. Thus the connection can only be made from the X1 terminal to the COM terminal on the control board of VFD.
Therefore to set up the control inputs, the only thing you have to do is connect one NO terminal of the push button to the terminal X1 (FWD) on the VFD and the other terminal to the common (COM) input.
Programming the VFD
Step 1: Access the Programming Menu
- Press the menu button to access the programming menu.
- Navigate to P0 and select P0.01.
- Set the main frequency source to 1, allowing control of the VFD output frequency using the up and down keys and ensuring the VFD holds the output value in case of power disconnection.
Step 2: Set the Command Source Selection
- Navigate to P03 to select the command source.
- Set P03.00 to 1, enabling operation through the control terminals.
Notes:
If you select 0 here, then the VFD will be operated through the control panel; If you select 1 here, then you can operate the VFD through these control terminals; If you select 2 here, then you can control the VFD by communication.
Step 3: Assign Forward Direction to the Push Button
- Navigate to P3 and select P3.00.
- Set the X1 digital input to 1, assigning the forward (FWD) input to the self-locking push button.
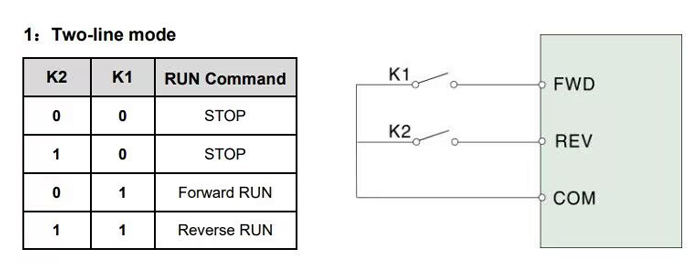
Step 4: Configure Two-Wire Control Mode
- Navigate to P3.14 and select 1 to enable two-wire control mode 2.
- Save the setting and exit the programming menu.
Motor Forward Running & Speed Control
Adjust the Speed
Use the potentiometer on the front panel to adjust the output frequency and regulate the motor speed.
Operate the Motor
- Press the push button to start the motor in the forward direction.
- Adjust the frequency to see the motor speed change.
- Press the switch again to stop the motor. The VFD will hold the last output frequency once the power is removed, ensuring seamless operation when power is restored.
By following these steps, you have successfully configured a self-lock push button into the VFD to control the forward running and stopping of a motor, while enjoying the flexibility of speed adjustment without worrying about power failure. Watch the below Video to learn more about wiring and programming steps.
If you're interested in exploring a wide range of VFDs, motors, push-button switches, and other industrial automation solutions, be sure to visit ATO.com.
