How to Fix a Joystick Switch?
Joysticks are essential components in various industrial applications, from controlling heavy machinery to navigating automated systems. Over time, these joysticks can experience wear and tear, leading to malfunctions. Knowing how to fix a joystick switch can save you time and money, ensuring your operations run smoothly. ATO.com will give you a step-by-step guide to help you troubleshoot and repair a faulty joystick switch.
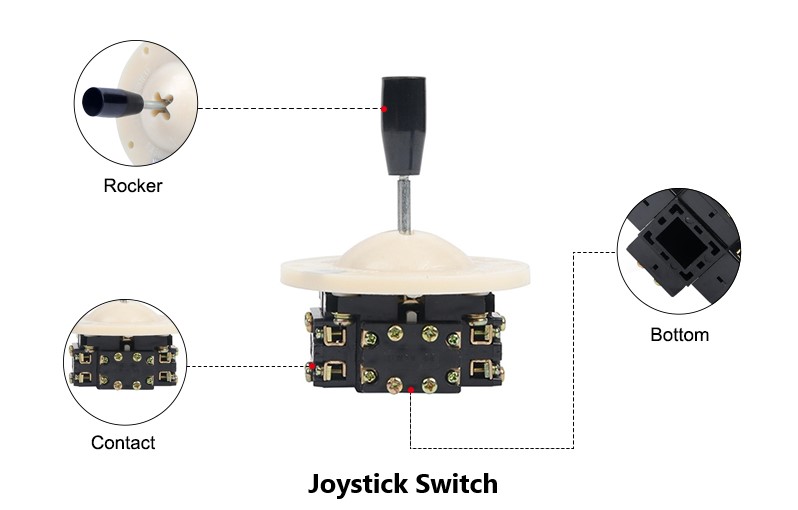
Understanding the Joystick Switch
A joystick switch typically consists of:
- A mechanical stick
- Contact switches or potentiometers
- A casing to house the components
- Electrical connections to transmit signals
Common issues with joystick switches include unresponsive buttons, erratic movements, and complete failure to transmit signals.
Tools You’ll Need
Before you start the repair, gather the following tools:
- Screwdrivers
- Multimeter
- Soldering iron and solder
- Replacement switches or potentiometers
- Cleaning solution and a soft brush
Step-by-Step Repair Guide
- Safety First: Ensure the machinery is powered off and disconnected from the power source. Safety is paramount to avoid any electrical hazards.
- Disassemble the Joystick: Use the appropriate screwdriver to remove the screws holding the joystick casing. Carefully open the casing to expose the internal components.
- Inspect the Switches: Look for any obvious signs of damage, such as broken wires, burnt components, or loose connections.
- Test the Switches: Use a multimeter to check the continuity of the switches or potentiometers. If there is no continuity, the component is likely faulty and needs replacement.
- Clean the Components: Dirt and debris can cause switches to malfunction. Use a cleaning solution and a soft brush to gently clean the internal components, focusing on the contact points.
- Replace Faulty Components: If you identified faulty switches or potentiometers, desolder the old components and solder in the new ones. Ensure the connections are secure and free from excess solder.
- Reassemble the Joystick: Once the repairs are complete, carefully reassemble the joystick casing. Make sure all screws are tightly secured.
- Test the Joystick: Reconnect the joystick momentary switch to the machinery and power it on. Test all functions to ensure the joystick operates smoothly and accurately.
Preventive Maintenance Tips
To extend the lifespan of your joystick switch, consider the following maintenance tips:
- Regularly clean the joystick to prevent dirt buildup.
- Inspect the joystick periodically for signs of wear and tear.
- Use protective covers in harsh industrial environments to shield the joystick from dust and moisture.
- Train operators to handle the joystick gently to avoid excessive force that can damage the switches.
Conclusion
Fixing a joystick switch in industrial applications requires a methodical approach to identify and repair faults. By following this guide, you can address common issues and keep your machinery operating efficiently. Regular maintenance and timely repairs will ensure the longevity of your joystick switches, minimizing downtime and enhancing productivity in your industrial operations.
